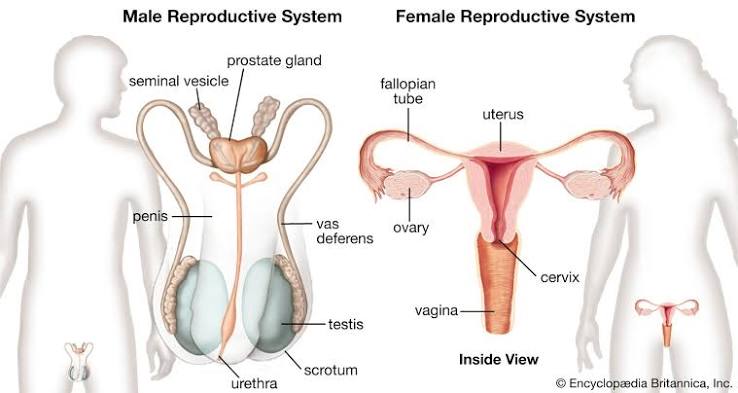
Introduction to reproductive physiology
A detailed introduction to reproductive physiology
A detailed introduction to reproductive physiology
Healing by third intention (tertiary intention or delayed primary closure) is a deliberate wound strategy: a wound is left open at first so contamination, oedema, devitalised tissue or infection can be controlled, then the clean, viable wound is closed later. It is an essential bridge between immediate primary closure and open secondary healing in emergency and surgical practice. At a glance What it is: planned delayed closure after a period of observation, drainage, debridement and source control. Why it is used: immediate suturing would trap organisms, foreign material or non-viable tissue and increase deep infection or dehiscence. Key safety rule: closure is performed only when perfusion is adequate, necrotic tissue has been removed, purulence has resolved and the wound is clinically improving. Typical settings: heavily contaminated lacerations, delayed traumatic wounds, contaminated bites, infected incisions after opening, open fractures and selected high-risk abdominal or perineal wounds. Learning outcomes By the end of this page, the learner should be able to define tertiary intention, select appropriate wounds, explain why initial closure is unsafe, describe the open-wound and reassessment stages, identify criteria for delayed primary closure, perform emergency wound assessment, anticipate complications and distinguish third intention from primary and secondary healing. 1. Definition and terminology Third intention is healing in which the wound edges are intentionally not apposed at the initial procedure. The wound is managed open while contamination, infection, tissue viability and swelling are addressed. Once a healthy wound bed has formed, the edges are brought together with sutures, staples, adhesive strips or another closure method. The later act of closing is called delayed primary closure (DPC) or tertiary closure. The wound still completes the normal biological sequence of haemostasis, inflammation, proliferation and remodelling. The difference is that mechanical edge apposition is postponed until the local environment is safer. In practice, “tertiary intention” refers to the whole strategy, whereas “delayed primary closure” refers specifically to the later closure event. 2. Why immediate primary closure may be dangerous Problem at presentation What immediate suturing can do Safer third-intention response Heavy soil, faeces, saliva, devitalised tissue or foreign material Seals bacteria and debris into dead space where oxygen and immune access are poor Copious irrigation, exploration and debridement; observe before closure Established infection, pus or abscess Creates pressure and prevents drainage; may worsen cellulitis or sepsis Open drainage, cultures when indicated, antibiotics for systemic or spreading infection, serial review Uncertain tissue viability Non-viable edges become a nutrient source for bacteria and a focus for necrosis Allow demarcation; repeat debridement until only viable tissue remains Marked oedema or crush injury Excess tension compromises microcirculation and causes ischaemia, necrosis and dehiscence Elevate, control swelling and reassess; close only without undue tension Delayed presentation Microbial multiplication and inflammatory exudate have increased since injury Treat as contaminated or infected according to findings rather than closing by the clock alone 3. Indications 3.1 Traumatic wounds Lacerations contaminated with soil, water, plant matter, grease or faeces after a delay before care. Crush, avulsion or degloving wounds in which the survival of skin flaps is uncertain. Wounds with devitalised edges requiring staged debridement. Large traumatic wounds in which immediate closure would leave substantial dead space. Open fractures after orthopaedic and plastic-surgical assessment, irrigation, debridement and stabilisation; definitive closure follows the local trauma protocol. 3.2 Bites and contaminated inoculation injuries Heavily contaminated dog, human or animal bites in locations where infection risk is high. Bites involving the hand, foot, cartilage, tendon sheath, joint, vascular structures or deep puncture tracks. Delayed bite wounds with devitalised tissue or early cellulitis. Facial wounds may be considered for carefully selected early closure because cosmesis and vascularity differ; specialist input is appropriate. 3.3 Surgical and healthcare-associated wounds An infected laparotomy, perineal, groin or orthopaedic incision after opening and drainage. Contaminated operative wounds where bowel spillage, perforation or gross infection has been controlled but immediate closure is unsafe. Wounds requiring serial re-look operations, such as selected necrotising soft-tissue infections after radical debridement. 4. When the wound must remain open Do not close simply because a certain number of hours has passed. Delay closure while any major hazard remains: purulent discharge, foul odour or an undrained abscess; progressive cellulitis, systemic toxicity or haemodynamic instability; necrotic, grey, dusky or clearly non-bleeding tissue; persistent foreign body, devitalised fascia or infected bone; uncontrolled contamination or a wound that cannot be adequately explored; poor perfusion, compartment syndrome or uncontrolled haemorrhage; large dead space or closure tension that will strangulate the margins; need for further debridement, imaging, revascularisation or specialist reconstruction. These are not absolute reasons to leave every wound open indefinitely; they are prompts to prioritise resuscitation, source control and specialist consultation. A patient with necrotising infection, vascular compromise or an open fracture needs urgent definitive care rather than routine delayed closure. 5. The stages of third-intention healing Stage 1: Initial assessment and resuscitation Use an ABCDE approach in major trauma and control life-threatening bleeding with direct pressure or a tourniquet when indicated. Document injury time, mechanism, contamination, bite or water exposure, tetanus status, comorbidities, medicines and allergies. Assess distal pulses, capillary refill, temperature, sensation, motor function and tendon/joint involvement before local anaesthesia whenever possible. Provide analgesia, irrigate visible contamination and obtain appropriate imaging when a foreign body, fracture or gas is suspected. Stage 2: Exploration, irrigation and source control After adequate analgesia or anaesthesia, inspect the entire wound through its depth. Irrigation removes loosely adherent bacteria and debris; it does not replace sharp debridement. Remove devitalised tissue conservatively while preserving viable structures, and drain abscesses. In selected deep, contaminated or surgical wounds, obtain cultures from deep tissue after cleaning rather than relying on a superficial swab. Give antimicrobial therapy when there is established infection, significant bite risk, open fracture or systemic illness, following local protocols. Stage 3: Temporary open management Cover the wound with a sterile, non-adherent dressing that maintains a moist—not macerated—environment. Use packing only when a cavity requires it, and record the material placed so it is removed. Elevate the limb, control oedema, provide nutrition and glycaemic control, and
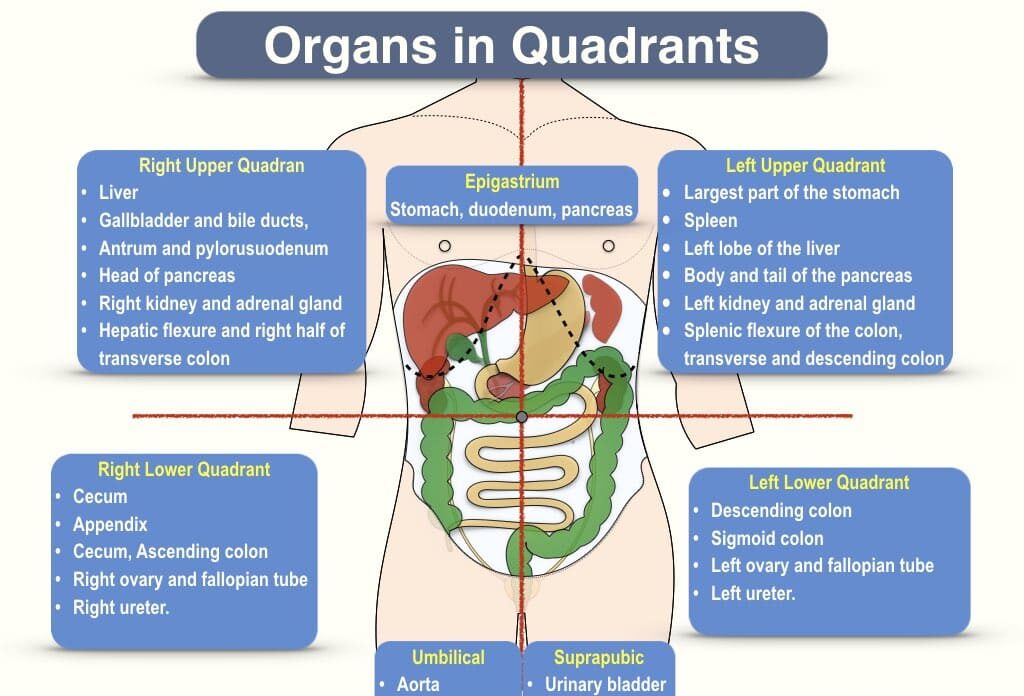
Body Regions, Abdominal Quadrants & Terminology Anatomy: Body Regions, Quadrants, and Terminology ANATOMY & PHYSIOLOGY I. Introduction to Body Regions The human body is divided into various anatomical regions to facilitate precise localization, communication, and study. This regional approach helps in systematically understanding the organization of structures (muscles, bones, nerves, vessels) and organs, which is crucial for physical examination, diagnosis, and surgical interventions. The body is broadly divided into two main parts: Axial Region: Forms the main axis of the body, comprising the head, neck, and trunk. Appendicular Region: Consists of the limbs (appendages) attached to the axial skeleton. II. The Axial Region The axial region forms the central core of the body and includes the most vital organs for survival. A. Head (Caput): Boundaries: Superior: Vertex (highest point of the skull). Inferior: Mandible (jawbone) and the base of the skull, connecting to the neck. Anterior: Face, extending from the forehead to the chin. Posterior: Occipital region. Lateral: Temporal and parietal regions. Key Features/Subdivisions: Cranium (Skull): Encloses and protects the brain. Subdivided into: Frontal: Forehead. Parietal: Sides and roof of the skull. Temporal: Sides of the head, inferior to parietal. Occipital: Back and base of the skull. Face (Facies): Contains sensory organs and the entry points for the digestive and respiratory systems. Subdivided into: Orbital: Around the eyes. Nasal: Nose region. Oral (Buccal): Mouth and cheeks. Mental: Chin. Zygomatic: Cheekbones. Auricular: Ear region. Clinical Significance (Head): Houses the brain (CNS), major sense organs (eyes, ears, nose, tongue), and is a common site for trauma, neurological assessment, and ENT (Ear, Nose, Throat) conditions. B. Neck (Cervix): Boundaries: Superior: Base of the skull and inferior border of the mandible. Inferior: Superior border of the clavicles (collarbones) and the superior border of the sternum (breastbone), extending posteriorly to the first thoracic vertebra. Anterior: From chin to suprasternal notch. Posterior: From occipital region to upper back. Key Features/Subdivisions: Anterior Cervical Region: Contains the trachea, larynx, thyroid gland, major blood vessels (carotid arteries, jugular veins), and neck muscles. Posterior Cervical Region (Nuchal Region): Contains the cervical vertebrae and deep back muscles. Lateral Cervical Region: Defined by the sternocleidomastoid muscle, dividing it into anterior and posterior triangles. Clinical Significance (Neck): Critical passageway for vital structures (airway, esophagus, major vessels, nerves, spinal cord). Common site for lymph node examination, thyroid assessment, and trauma. C. Trunk (Truncus): The trunk is the largest region of the axial body, divided into the thorax, abdomen, and pelvis. 1. Thorax (Chest): Boundaries: Superior: Thoracic inlet (superior aperture of the thorax), continuous with the neck. Inferior: Diaphragm, separating it from the abdomen. Anterior: Sternum and costal cartilages. Posterior: Thoracic vertebrae. Lateral: Ribs and intercostal muscles. Key Features/Subdivisions: Thoracic Wall: Provides bony protection (rib cage). Thoracic Cavity: Contains the heart, lungs, great vessels, esophagus, trachea, and thymus gland. Breasts (Mammary Region): Located anteriorly, superficial to the pectoralis major muscle. Clinical Significance: Houses vital respiratory and circulatory organs. Site for respiratory and cardiac examinations, chest trauma, and breast pathologies. 2. Abdomen: Boundaries: Superior: Diaphragm. Inferior: Continuous with the pelvis at the level of the pelvic inlet. Anterior/Lateral: Abdominal wall muscles (rectus abdominis, obliques, transversus abdominis). Posterior: Lumbar vertebrae and associated muscles. Key Features/Subdivisions: Abdominal Cavity: Contains most of the digestive organs, spleen, kidneys, adrenal glands. Abdominal Wall: Muscular layers provide support and protect organs. Clinical Significance: Site of many digestive, urinary, and reproductive system pathologies. Crucial for abdominal examination, assessment of pain, and surgical access. 3. Pelvis: Boundaries: Superior: Pelvic inlet (linea terminalis), continuous with the abdomen. Inferior: Pelvic outlet (pelvic diaphragm/floor). Lateral: Hip bones (ilium, ischium, pubis). Posterior: Sacrum and coccyx. Key Features/Subdivisions: Pelvic Cavity: Contains the urinary bladder, rectum, and reproductive organs. Perineum: Region inferior to the pelvic diaphragm, containing external genitalia and anal canal. Clinical Significance: Houses urinary, reproductive, and terminal digestive organs. Important for urological, gynecological, and colorectal examinations. III. The Appendicular Region The appendicular region consists of the upper and lower limbs, specialized for movement and manipulation. A. Upper Limb (Extremitas Superior): Boundaries: Attached to the axial skeleton via the pectoral girdle (scapula and clavicle). Key Features/Subdivisions: Shoulder (Deltoid Region): Proximal attachment to the trunk, site of glenohumeral joint. Arm (Brachium): Between shoulder and elbow. Contains humerus. Elbow (Cubital Region): Joint between arm and forearm. Forearm (Antebrachium): Between elbow and wrist. Contains radius and ulna. Wrist (Carpus): Joint between forearm and hand. Hand (Manus): Distal end, highly mobile and manipulative. Subdivided into: Palm (Palmar/Volar aspect): Anterior surface. Dorsum (Dorsal aspect): Posterior surface. Digits (Fingers): Phalanges. Clinical Significance: High mobility, frequent site of fractures, dislocations, nerve entrapments (e.g., carpal tunnel syndrome), and vascular issues. B. Lower Limb (Extremitas Inferior): Boundaries: Attached to the axial skeleton via the pelvic girdle (hip bones). Key Features/Subdivisions: Hip (Coxal Region): Proximal attachment to the trunk, site of hip joint. Thigh (Femoral Region): Between hip and knee. Contains femur. Knee (Patellar/Popliteal Region): Joint between thigh and leg. Patellar: Anterior aspect (kneecap). Popliteal: Posterior aspect (back of knee). Leg (Crus): Between knee and ankle. Contains tibia and fibula. Ankle (Tarsus): Joint between leg and foot. Foot (Pes): Distal end, weight-bearing and propulsion. Subdivided into: Dorsum: Superior surface. Plantar: Inferior surface (sole). Digits (Toes): Phalanges. Clinical Significance: Weight-bearing, locomotion. Common site for fractures, sprains (ankle), degenerative joint disease (knee, hip), and vascular conditions (e.g., DVT). Region Subdivision(s) Key Bony/Muscular Boundaries Key Contents/Features Axial: Head Cranium, Face Skull bones, Mandible Brain, Sense organs (eyes, ears, nose, mouth) Axial: Neck Anterior, Posterior, Lateral Base of skull, Mandible, Clavicles, Sternum, C7 vertebra Trachea, Larynx, Thyroid, Carotids, Jugulars, Cervical spine Axial: Trunk (Thorax) Thorax Rib cage, Sternum, Thoracic vertebrae, Diaphragm (inferior) Heart, Lungs, Esophagus, Trachea, Great vessels, Breasts Axial: Trunk (Abdomen) Abdomen Diaphragm (superior), Pelvic inlet (inferior), Abdominal muscles, Lumbar vertebrae Most digestive organs, Kidneys, Spleen, Adrenals Axial: Trunk (Pelvis) Pelvis Pelvic inlet (superior), Pelvic floor (inferior), Hip bones, Sacrum, Coccyx Bladder, Rectum, Reproductive organs Appendicular: Upper Limb Shoulder, Arm, Elbow, Forearm, Wrist, Hand Pectoral girdle, Humerus, Radius, Ulna, Carpals, Metacarpals, Phalanges Muscles, Nerves (e.g., Brachial plexus), Vessels (e.g., Brachial artery)
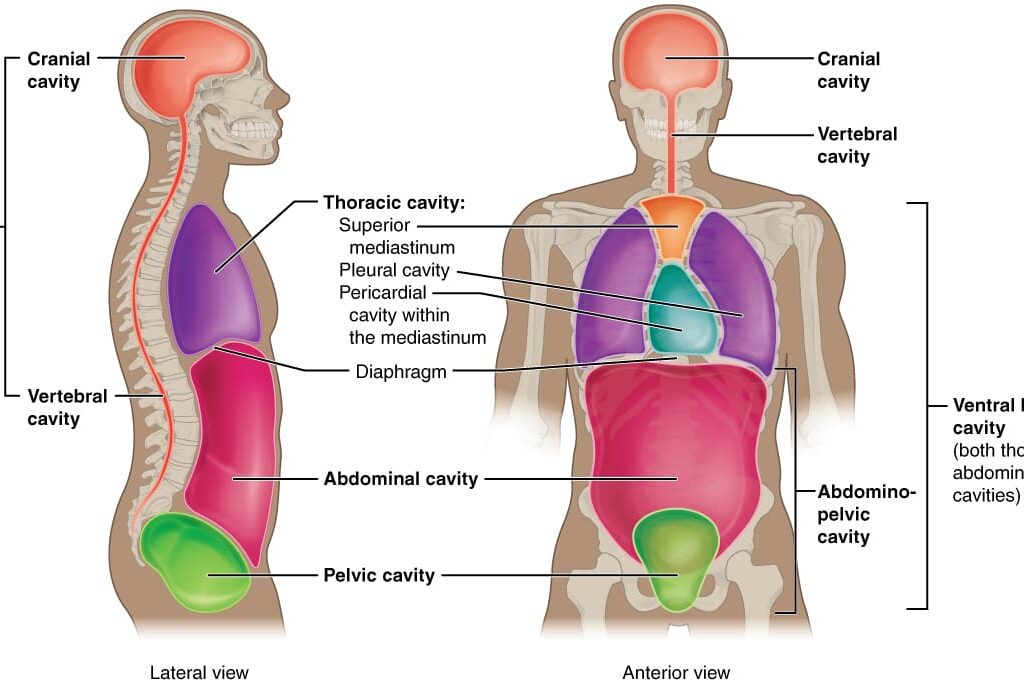
INTRODUCTION TO BODY CAVITIES Anatomy: Body Cavities Reference HUMAN ANATOMY I. Introduction to Body Cavities Body cavities are enclosed, fluid-filled spaces within the human body that contain and protect internal organs. They are crucial for: Protection: Cushioning delicate organs from shocks and impacts. Support: Providing a stable environment for organs. Permitting organ movement: Allowing organs to change size and shape (e.g., heart beating, lungs expanding, stomach distending) without friction or damage to surrounding tissues. The human body possesses two main sets of internal cavities: the Dorsal Body Cavity and the Ventral Body Cavity. These cavities are formed during embryonic development and house organs of the nervous, circulatory, respiratory, digestive, urinary, and reproductive systems. II. The Dorsal Body Cavity The dorsal body cavity is located posteriorly and protects the fragile organs of the central nervous system. It has two continuous subdivisions: A. Cranial Cavity Definition: The space enclosed by the cranium (skull). Boundaries: Superior, Lateral, Posterior: Formed by the cranial bones (frontal, parietal, temporal, occipital, sphenoid, ethmoid). Inferior: Formed by the floor of the cranium, which contains the foramen magnum (a large opening through which the brainstem connects to the spinal cord). Contents: Brain: The primary organ of the central nervous system, responsible for thought, sensation, and coordination. Meninges: Three protective membranes (dura mater, arachnoid mater, pia mater) that surround the brain and spinal cord. Cerebrospinal Fluid (CSF): A clear fluid that circulates within the meninges and ventricles of the brain, providing cushioning and nutrient transport. Blood Vessels: Arteries, veins, and venous sinuses that supply and drain blood from the brain. Cranial Nerves: Twelve pairs of nerves that emerge directly from the brain. B. Vertebral (Spinal) Cavity Definition: The space formed by the vertebral column, extending from the foramen magnum to the sacrum. Boundaries: Anterior, Lateral, Posterior: Formed by the vertebral arches of the individual vertebrae, which collectively create the vertebral canal. Superior: Continuous with the cranial cavity at the foramen magnum. Inferior: Ends at the sacrum. Contents: Spinal Cord: A long, delicate structure that extends from the brainstem, transmitting nerve signals throughout the body. Meninges: (Dura mater, arachnoid mater, pia mater) that continue from the brain, enclosing the spinal cord. Cerebrospinal Fluid (CSF): Circulates within the subarachnoid space around the spinal cord. Spinal Nerves: Nerves that branch off the spinal cord at each vertebral level. Blood Vessels: Supplying and draining the spinal cord. III. The Ventral Body Cavity The ventral body cavity is much larger than the dorsal cavity and is located anteriorly. It houses a wide range of visceral organs (organs of the digestive, urinary, respiratory, and reproductive systems) and is subdivided by the diaphragm into two main parts: the Thoracic Cavity (superior) and the Abdominopelvic Cavity (inferior). A. Thoracic Cavity: Definition: The superior subdivision of the ventral body cavity, enclosed by the rib cage. Boundaries: Superior: Thoracic inlet (formed by the first thoracic vertebra, first pair of ribs, and manubrium of the sternum). Inferior: Diaphragm (a large, dome-shaped muscle that separates the thoracic and abdominopelvic cavities). Anterior: Sternum and costal cartilages. Posterior: Thoracic vertebrae. Lateral: Ribs and intercostal muscles. Subdivisions within the Thoracic Cavity: Pleural Cavities (x2): Definition: Two lateral compartments, each surrounding a lung. These are potential spaces between the parietal and visceral pleura. Contents: Lungs. Mediastinum: Definition: The central compartment of the thoracic cavity, located between the two pleural cavities. It extends from the sternum anteriorly to the vertebral column posteriorly, and from the thoracic inlet superiorly to the diaphragm inferiorly. Contents: Heart: Enclosed within the pericardial cavity. Great Vessels: Aorta, pulmonary trunk, superior and inferior vena cava. Trachea: Windpipe. Esophagus: Food pipe. Thymus Gland: Located anteriorly in the superior mediastinum (larger in children, atrophies in adults). Lymph Nodes, Nerves: (e.g., vagus, phrenic), Major Bronchi. B. Abdominopelvic Cavity: Definition: The inferior subdivision of the ventral body cavity, located inferior to the diaphragm. It is generally described as having two indistinct parts: the abdominal cavity and the pelvic cavity, as there is no physical barrier separating them. Boundaries: Superior: Diaphragm. Inferior: Pelvic floor (pelvic diaphragm), formed by muscles and fascia. Anterior/Lateral: Abdominal wall muscles. Posterior: Lumbar vertebrae and associated muscles. Subdivisions within the Abdominopelvic Cavity: Abdominal Cavity: Definition: The superior and larger portion of the abdominopelvic cavity. Contents: Digestive Organs: Stomach, small intestine, most of the large intestine, liver, gallbladder, pancreas, spleen. Kidneys and Adrenal Glands: Located retroperitoneally (behind the peritoneum). Portions of Ureters. Many major blood vessels: (e.g., abdominal aorta, inferior vena cava). Pelvic Cavity: Definition: The inferior and smaller portion of the abdominopelvic cavity, located within the bony pelvis. Boundaries: Formed by the bony pelvis (ilium, ischium, pubis, sacrum, coccyx) and the muscles of the pelvic floor. Contents: Urinary Bladder. Sigmoid Colon and Rectum: (terminal part of the large intestine). Reproductive Organs: Females: Uterus, ovaries, fallopian tubes, vagina. Males: Prostate gland, seminal vesicles. Summary Table of Major Body Cavities: Cavity Name Subdivisions Major Boundaries Key Contents Dorsal Body Cavity Cranial Cavity Cranium Brain, Meninges, CSF Vertebral Cavity Vertebral Column Spinal Cord, Meninges, CSF Ventral Body Cavity Thoracic Cavity Rib Cage, Sternum, Thoracic Vertebrae, Diaphragm (inferior) Lungs (in pleural cavities), Heart (in pericardial cavity), Trachea, Esophagus, Thymus Pleural Cavities (x2) Within Thoracic Cavity, surrounding lungs Lungs Mediastinum Central compartment of Thoracic Cavity Heart, Great Vessels, Trachea, Esophagus, Thymus Abdominopelvic Cavity (Full Cavity) Diaphragm (superior), Pelvic Floor (inferior), Abdominal Muscles, Lumbar Vertebrae Digestive Organs (stomach, intestines, liver, etc.), Kidneys, Bladder, Reproductive Organs Abdominal Cavity Superior portion of Abdominopelvic Cavity Stomach, Small/Large Intestines, Liver, Spleen, Pancreas, Kidneys Pelvic Cavity Inferior portion of Abdominopelvic Cavity, within bony pelvis Bladder, Rectum, Reproductive Organs IV. Protective Functions of Body Cavities Body cavities provide much more than just space for organs; they are integral to their protection and optimal function. A. Mechanical Protection: Cushioning: The fluid within cavities (like CSF in the dorsal cavity, or serous fluid in the ventral cavity) and the surrounding structures (bone, muscle) help absorb shock and impact, protecting delicate organs from external trauma. Containment: The rigid bony structures surrounding the dorsal cavity (cranium, vertebral column) and
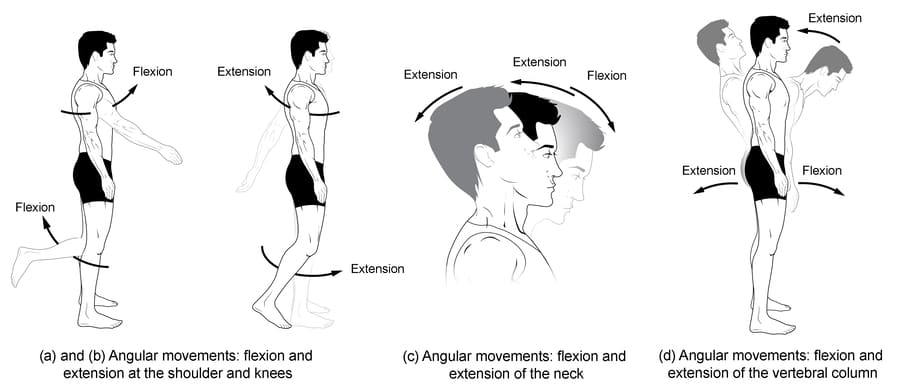
ANATOMICAL MOVEMENTS Anatomy: Planes, Axes, and Movements ANATOMY & KINESIOLOGY Introduction to Anatomical Planes Understanding anatomical planes is fundamental to describing the location of structures and, more importantly, the direction of movement within the human body. These are imaginary flat surfaces that pass through the body, dividing it into sections. All movements occur within or parallel to these planes. A. Standard Anatomical Position Reminder: Before discussing planes, it’s crucial to recall the standard anatomical position: Body erect Feet slightly apart Palms facing forward Thumbs pointing away from the body All descriptions of planes and movements assume the body is in this position. B. The Three Cardinal Planes: 1. Sagittal Plane Definition: A vertical plane that divides the body or an organ into right and left parts. Orientation: Runs vertically from front to back. Key Divisions: Midsagittal (Median) Plane: Lies exactly in the midline, dividing the body into equal right and left halves. Often used as a reference point. Parasagittal Planes: All other sagittal planes offset from the midline, dividing the body into unequal right and left parts. Movements Associated: Primarily flexion and extension. These involve anterior-posterior motion. Analogy: Imagine a wall cutting through your body from your nose to your spine. 2. Frontal (Coronal) Plane Definition: A vertical plane that divides the body or an organ into anterior (front) and posterior (back) parts. Orientation: Runs vertically from side to side, perpendicular to the sagittal plane. Movements Associated: Primarily abduction and adduction. These involve medial-lateral motion. Analogy: Imagine a wall cutting through your body from one shoulder to the other. 3. Transverse (Horizontal) Plane Definition: A horizontal plane that divides the body or an organ into superior (upper) and inferior (lower) parts. Orientation: Runs horizontally, perpendicular to both sagittal and frontal planes. Key Divisions: Often referred to as cross-sectional planes, especially in imaging (e.g., CT scans, MRIs). Movements Associated: Primarily rotational movements (medial/internal and lateral/external rotation). Analogy: Imagine a table slicing through your body at the waist. C. Clinical Relevance of Planes: Medical Imaging: Radiologists extensively use these planes to orient images (e.g., MRI, CT, ultrasound) and describe the location of pathologies. Surgical Planning: Surgeons plan incisions and approaches based on anatomical planes. Rehabilitation: Therapists describe exercises and patient movements in relation to these planes to ensure correct form and target specific muscle groups. Biomechanics: Researchers analyze human movement by breaking it down into components occurring in specific planes. II. Anatomical Axes of Rotation Movement at a joint occurs around an imaginary line called an axis of rotation. Each axis is perpendicular to the plane in which the movement occurs. Think of the axis as a pivot point around which the bone rotates. A. The Three Major Axes: Mediolateral (Transverse) Axis: Orientation: Runs horizontally from side to side (left to right or right to left). Relationship to Planes: Perpendicular to the sagittal plane. Movements Associated: Movements that occur in the sagittal plane, such as flexion and extension. Example: Bending your elbow (flexion) or straightening it (extension) occurs around a mediolateral axis passing through the elbow joint. Anteroposterior (Sagittal) Axis: Orientation: Runs horizontally from front to back (anterior to posterior or posterior to anterior). Relationship to Planes: Perpendicular to the frontal (coronal) plane. Movements Associated: Movements that occur in the frontal plane, such as abduction and adduction. Example: Lifting your arm out to the side (abduction) or bringing it back to your body (adduction) occurs around an anteroposterior axis passing through the shoulder joint. Vertical (Longitudinal) Axis: Orientation: Runs vertically from superior to inferior (up and down). Relationship to Planes: Perpendicular to the transverse (horizontal) plane. Movements Associated: Movements that occur in the transverse plane, primarily rotational movements (medial/internal rotation, lateral/external rotation). Example: Turning your head left and right (rotation of the neck) occurs around a vertical axis passing through the cervical spine. Rotating your arm inward or outward at the shoulder also occurs around a vertical axis. B. Summary Table: Plane of Movement Axis of Rotation Primary Movements Sagittal Mediolateral (Transverse) Flexion, Extension Frontal (Coronal) Anteroposterior (Sagittal) Abduction, Adduction Transverse (Horizontal) Vertical (Longitudinal) Rotation (Medial/Lateral) C. Importance of Axes: Biomechanics: Crucial for analyzing the mechanics of movement and understanding forces acting on joints. Exercise Science: Helps in designing exercises that target specific planes of motion and strengthen muscles responsible for movements around particular axes. Prosthetics and Orthotics: Design of artificial limbs and braces must consider the natural axes of human joint movement. Activity for Students: To reinforce understanding, perform simple movements and identify the plane and axis for each: Nodding head “yes” (flexion/extension) Shaking head “no” (rotation) Jumping jacks (abduction/adduction of arms and legs) Bicep curl (flexion/extension of elbow) Trunk rotation III. Classification of Anatomical Movements Anatomical movements are typically described at synovial joints, which allow for a wide range of motion. Movements are often described in pairs, as they are opposing actions. A. Movements in the Sagittal Plane (around a Mediolateral Axis): 1. Flexion: Definition: Movement that decreases the angle between two body parts. For most joints, this involves bringing the anterior surfaces closer together, or in the case of the knee and elbow, bringing posterior surfaces closer. Examples: Shoulder: Bringing the arm forward and upward. Elbow: Bending the arm, bringing the forearm closer to the upper arm. Wrist: Bending the hand anteriorly towards the forearm. Hip: Bringing the thigh forward and upward. Knee: Bending the leg, bringing the heel towards the buttocks. Trunk/Spine: Bending forward at the waist. Neck: Bending the head forward, chin towards the chest. Key Muscles (Examples): Biceps brachii (elbow), Pectoralis major (shoulder), Iliopsoas (hip), Hamstrings (knee). 2. Extension: Definition: Movement that increases the angle between two body parts, effectively straightening the joint. It is generally the reverse of flexion. Hyperextension: Extension beyond the normal anatomical limit. This can indicate injury or hypermobility. Examples: Shoulder: Moving the arm backward from the anatomical position. Elbow: Straightening the arm. Wrist: Straightening the hand with the forearm (or moving it posteriorly). Hip: Moving the thigh backward. Knee: Straightening the leg. Trunk/Spine: Bending backward at the waist. Neck: Extending
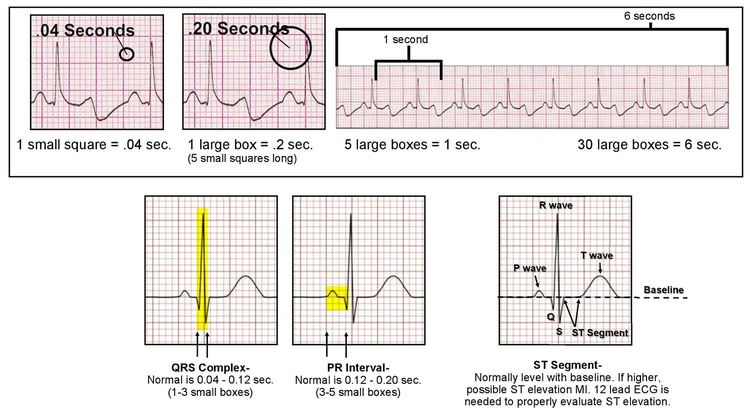
ELECTROCARDIOGRAM INTERPRETATION ELECTROCARDIOGRAM (ECG) Electrocardiogram is a graphic record of algebraic summed potentials generated by the heart, recorded from the surface of the body using an electrocardiograph machine. The magnitude, polarity, and configuration of the recorded electrocardiogram depends on the location of the recording leads placed on the body surface. The process of recording an electrocardiogram is called electrocardiography. Aims and Objectives Carry out electrocardiography correctly and successfully. Interpret the electrocardiogram recorded. Relate the interpretation with the heart status. Assess the functional integrity of the heart. Suggest the appropriate remedy if any that can improve the status detected. Requirements Functional Electrocardiograph machine & accessories Volunteer subject Volunteer ECG operator Couch with linen Screen (for privacy) Cotton wool/tissue and spirit/alcohol Procedure The lab technician/tutor will introduce the electrocardiograph machine in use with its operational procedures. The procedure of electrocardiography will be thoroughly explained to the volunteer subject by the volunteer operator. The subject will be screened off, asked to undress to expose the chest, both upper limbs and both legs. The subject then lies on his or her back on the couch, and relaxes while breathing quietly throughout the procedure. The rest of the body surface that is not to be used is covered with linen. The volunteer ECG operator prepares the surfaces for the leads electrodes attachment by clearing it with cotton wool soaked in alcohol or spirit. Thinly coat the surfaces prepared with salt enriched electrode jelly and proceed to strap electrodes appropriately. Record manually lead by lead till you get all the 12 leads designated, then proceed to record automatically all the 12 leads record as well. Label the electrocardiogram recorded with the volunteer’s particulars namely: Name, Sex, Age, time of recording, any medicines taken, and finally any known medical condition the volunteer subject has. Switch off the electrocardiograph machine and disconnect off the subject. Clean off the jelly applied on the subject with water and dry with cotton wool or tissue. Results Analysis of Results Note: Attached is a tracing of a normal 12 lead electrocardiogram (ECG) and the relationship of the events of the cardiac cycle to the waves and intervals of the normal left ventricular surfaces complex. Use these to help you analyze your recorded ECG. 1. Estimate the frontal and horizontal plane QRS axes: 2. Describe the atrial pace maker and indicate its rate and regulating: 3. Describe the nature and duration of atrial activation (P wave): 4. Describe any supra ventricular premature contractions: 5. Describe the AV junction conductions: 6. Describe the rate duration and regularity of ventricular activation and site of its pace maker (QRS complex wave): 7. Describe the course of ventricular activation and the shape of the QRS complex: 8. Describe any abnormalities in J point and S-T segments: 9. Describe T wave changes: 10. Describe alteration in Q-T interval in relation to rate: Conclusion Recommendation / Suggestions Discussion Questions 1. What is the significance of: i. P wave: ii. QRS complex: iii. T wave: 2. Why is P wave usually largest in standard lead II? 3. Why is T wave small or absent in lead aVL? 4. What is the significance of the interval between the end of P wave and the beginning of the QRS complex? 5. What factors influence the duration of the: i. P-R interval: ii. Q-T interval: Reference: A Normal 12-Lead Electrocardiogram Layout I aVR V1 V4 II aVL V2 V5 III aVF V3 V6 Physiology Steeplechase: ECG Interpretation ECG Steeplechase Experiment: Electrocardiography Must Know: Waves: P (Atrial), QRS (Ventricular), T (Repolarization). Calculations: 300 / Big Squares = Rate. Placement: V4 is at the Apex (5th ICS, Mid-Clavicular). Pathology: ST Elevation = Infarction. Start ECG Quiz Station 1 Interpretation Check Answer Next Station Exam Completed! Results for . Score 0/0 Accuracy 0% Download ECG Report Processing images and generating PDF…
RED BLOOD CELL COUNT & WBC COUNT DETERMINATION OF RED BLOOD CELL COUNT Principle The methods generally used are based on the estimation of the number of cells in a small volume of diluted blood. The counting is carried out in a glass counting chamber. The volume of the fluid over each square is calculated from the area of a square and the depth of the fluid layer over it. Core Concept: The average number of cells lying on one square is found from the counts of a series of squares. The product of this average number by the dilution gives the average number of cells in the undiluted blood. Aim: To enumerate the number of RBCs per cubic millimeter of blood. Student Objectives After completion of this experiment, you should be able to: Describe the relevance determining the red cell count. Identify the different equipment and reagents used in this experiment. List the normal red cell count in different age groups. Outline the common physiological and pathological conditions that cause an increase or decrease in the red cell count. Materials and Apparatus 1. RBC Diluting Pipette Specifications: Bulb type. Graduated to give a dilution of 1 in 100 or 1 in 200. Stem Markings: 0.5 and 1.0. Upper Line: 101 (immediately above the bulb). Red Bead: Located in the bulb to facilitate mixing of the blood and diluting fluid. 2. Hayem’s Fluid (Diluting Fluid) Properties: Must be isotonic; causes neither hemolysis nor crenation. Contains a fixative to preserve shape and prevent autolysis. Prevents agglutination/rouleaux. Composition (per 200ml) NaCl (3.8%): 1.0 g Sodium Sulfate (Na₂SO₄): 5.0 g Mercuric Chloride (HgCl₂): 0.5 g Distilled Water: 200 ml Function of Ingredients NaCl & Na₂SO₄: Provide isotonicity (prevents shape change) and anticoagulant properties (prevents rouleaux). Mercuric Chloride: Fixative, antifungal, and antimicrobial agent. 3. Neubauer Haemocytometer Consists of a thick glass slide with a central platform 0.1mm lower than the side platforms (Depth of chamber = 0.1mm). The Ruled Area (Center): Divided into 16 medium sized squares. Each medium square is subdivided into 16 small squares. Area of smallest square = 1/400 sq. mm. Counting Area: The red cells lying in 5 of the medium squares (E1, E2, E3, E4, and E5) are counted. NB: For use, the haemocytometer as well as the diluting pipette must be clean, dry and absolutely grease free. Procedure Sampling: Fill the pipette up to mark 0.5 on the scale with blood from the finger tip. Diluting: Wipe the outside of the pipette. Draw Hayem’s fluid up to mark 101. Close the tip, detach sucker, and mix well (shaking 3-4 mins). Chamber Prep: Place coverslip on counting chamber. Apply gentle pressure until Newton rings (rainbow colors) appear. Discarding: Discard the first few drops (they contain no cells). Charging: Fill the chamber by holding the pipette tip against the edge of the coverslip. Do not overfill into troughs. Settling: Allow several minutes for cells to settle. Counting: Count red cells in 80 small squares (5 groups of 16 squares: E1-E5). Rule: Include cells touching top and right border lines only. CALCULATION Dimensions Area of 1 small square = 1/400 sq mm Depth of chamber = 1/10 mm Volume of 1 square = 1/4000 cu mm Variables N = Total cells counted in 80 squares Dilution Factor = 200 Squares Counted = 80 Final Formula (Cells per cu mm): Total = N × 10,000 Derivation: (N × 4000 × 200) / 80 QUESTIONS When blood is taken to the mark 0.5 and diluent to mark 101, why is the dilution 1 in 200 and not 1 in 202? Why is blood diluted 200 times for red cell count? What is the function of the bead in the bulb? If Hayem’s solution is not available, can you use any other? How will you differentiate red cells from dust particles? What is the fate of leukocytes in this experiment? Since the mature red cells do not contain ‘nuclei’, are they dead cells? Explain your answer. Explain the possible errors that could arise in obtaining and diluting blood, due to uneven distribution of cells in the counting chamber, due to mechanical causes and from other sources. DETERMINATION OF THE DIFFERENTIAL WHITE BLOOD CELL COUNT Student Objectives At the end of this experiment, you should be able to: Identify all equipment and reagents used in the determination of the differential WBC count. Describe the relevance and importance of preparing and staining a blood smear and doing a differential leukocyte count. Prepare satisfactory blood films, fix and stain them and describe the features of a well stained film. Identify different blood cells in a film and indicate the identifying features of each type of leukocyte. Differentiate between neutrophils, eosinophils, basophils, monocytes, and lymphocytes. Describe the functions of each type of the different leukocytes. Outline the conditions in which the leukocyte numbers increase or decrease. Relevance & Principle Relevance: Many hematological and other disorders can be diagnosed by a careful examination of a stained blood film. A physician may order a differential leukocyte count (always along with the total leukocyte count) to differentiate between the different causes of infection (e.g. bacterial vs. viral causes) depending on which sub-category of leukocyte is greatly affected. The differential leukocyte count is also done to monitor blood diseases like leukemia, or to detect allergic or parasitic infection. Principle: A blood film is stained with Leishman’s stain and scanned under oil immersion, from one end to the other. As each WBC is encountered, it is identified until 100 leukocytes have been examined. The percentage distribution of each type of WBC is then calculated. Procedure Wipe the punctured finger with a piece of cotton wool soaked in alcohol, and allow a fresh drop of blood to accumulate. Hold a clean, dry microscope slide between the thumb and forefinger of the left hand. The slide is held by the corners of its right hand end so that its length extends at an approximate angle of 45 degrees above the left thumb and forefinger.
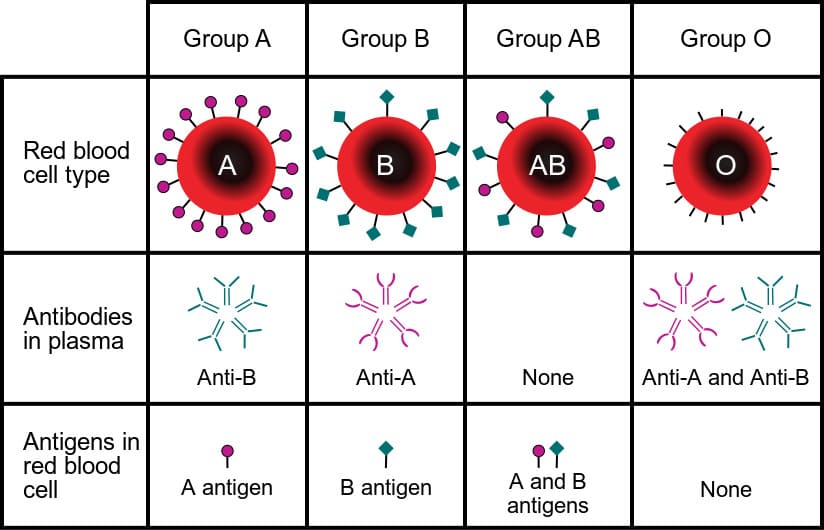
BLOOD TYPING & CROSSMATCHING BLOOD TYPING & CROSSMATCHING EXPERIMENT : BLOOD TYPING This experiment is a collection of measurements routinely carried out in hospital laboratories. The method chosen in the hospital will be a compromise between available instruments and wanted accuracy. Here we want you to get familiar with some of the most commonly used methods in this country. Student Objectives At the end of the experiment, you should be able to: Identify the different equipment and reagents used in this experiment stating the relevance of each. Define the terms blood “groups” and “blood types”, and name the various blood grouping systems. Describe the physiological basis of blood grouping and state its clinical significance. Explain the basis of the terms “universal donor” and “universal recipient”. Describe the significance of Rh factor determination. Determine blood groups by using commercially available anti-sera, and precautions to be observed. Explain how blood is screened and stored in blood banks, and outline the changes that occur when blood is stored. List the indications for blood transfusion. Explain the relevance of matching donor and recipient blood groups before transfusion. Blood Groups / Types The membrane of each red blood cell contains millions of antigens that are ignored by the immune system. However, when patients receive blood transfusions, their immune systems will attack any donor red blood cells that contain antigens that differ from their self-antigens. Therefore, ensuring that the antigens of transfused red blood cells match those of the patient’s red blood cells is essential for a safe blood transfusion. The most common and relevant of these antigens are the 3 antigens that form the ABO blood group system and Rhesus antigens that make up the Rhesus blood group. The presence of the three ABO agglutinogens (determined by three allelic genes) residing on the surface of red blood cells and the presence in the serum of three specific antibodies (agglutinins) to these genetically determined antigens is responsible for the major blood group antigen-antibody reactions, which may occur as a result of blood transfusions. Genotypes & Phenotypes Six genotypes in the ABO blood grouping system may exist: Genotype OO Group O Genotype AA, AO Group A Genotype BB, BO Group B Genotype AB Group AB Note: A and B are dominant over the gene O. Therefore, genotype BO cannot be serologically distinguished from BB, and AO cannot be serologically distinguished from AA. In addition, there exists other less common blood grouping systems like: the Duffy, Kell, Diego, Kidd, and MNS blood groups among others. This practical session however will focus on the ABO and Rhesus blood grouping systems since they are the most assessed clinically in hospital, and contribute the major bulk of blood transfusion reactions. Principle Landsteiner’s Law States that if a particular antigen is present in the red blood cells, the corresponding antibody must be absent in the serum. If the particular antigen is absent in the red blood cells the corresponding antibody must be present in the serum. Blood typing is performed on the basis of agglutination. Agglutination occurs if an antigen is mixed with its corresponding antibody. Instructions The normal procedure is to mix the unknown cells with two known sera containing A or B agglutinogens. You are provided with unknown red blood cells and a series of known sera samples. Later in the practical, you will be required to obtain samples of your own (or your friends) blood by cleaning the fourth fingertip with alcohol and puncturing it with a sterile blood lancet. This has a shoulder that prevents too deep entry; therefore a sharp stab with the lancet gives a better blood supply, than a tiny prick. Group Tasks: Typing of unknown red blood cells. Typing of own blood both ABO and Rh. Cross-matching of incompatible bloods. Procedures 1. ABO Blood Grouping Label a series of grooves on a tile: Anti A, Anti B, Anti AB, and Control. Divide it into two halves with a grease pencil for blood sample X (known) and Y (unknown). Place one drop of serum in each groove with a glass rod. Repeat for each sample, taking care to wash and dry the rod between samples. Prepare a control groove using 0.9% saline instead of serum. Using one end of the glass rod mix the blood in the sera in each trough thoroughly for 30 seconds. Stir for 2 minutes and observe for agglutination. Record your findings and determine the group of the unknown blood and own blood used. Observation: Agglutination may be visible to the naked eye as microscopic clumps like cayenne pepper grains or will be seen as smaller clumps under the microscope. The control will appear unaltered at the end of fifteen minutes when a final inspection should be made. 2. Rh Blood Grouping Follow steps 1-6 of the ABO system above using the Anti-D sera. Examine for evidence of agglutination. If agglutination did not occur within 2 minutes, record the blood as Rh negative. If agglutination occurred within 2 minutes, record the blood as Rh positive. OBSERVATIONS Name/ID Anti-A Anti-B Anti-AB Rh (Anti-D) Blood Group Sample X Sample Y Own Blood Note: Mark (+) for agglutination and (-) for no agglutination. EXPERIMENT : CROSS-MATCHING This experiment is designed to imitate the conditions appertaining to a transfusion of incompatible blood. Re-group partners so that incompatible bloods work together. Call one the ‘donor’ and the other the ‘recipient’. Principle The Reaction: Place on a slide one drop of a 1/10 dilution of ‘donor’ blood in citrate-saline. Add 1 drop of undiluted ‘recipient’ blood and mix immediately. Observation: The donor’s cells are outnumbered ten to one by the recipient’s but are observed clumped together in small groups. The recipient’s cells float freely in the plasma in which the donor’s agglutinins are diluted twenty times. Universal Donor Concept: That such a dilution of agglutinins fails to affect the recipient’s cells is the basis for the use of Group O blood for transfusion into any recipient in an emergency. Group O is thus sometimes called the
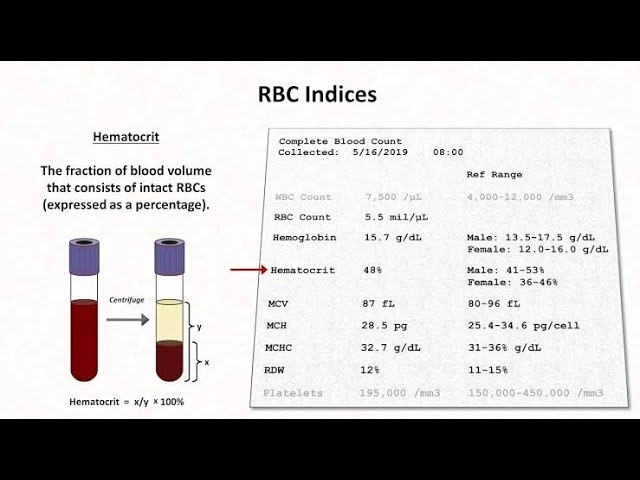
HAEMATOLOGICAL INDICES – PCV, MCV, MCH HAEMATOLOGICAL INDICES: PCV ESTIMATION Student Objectives (PCV Experiment) At the end of this experiment, you should be able to: Identify all equipment and reagents used in the determination of PCV. Define hematocrit, and explain its clinical significance. Briefly describe physiological/pathological factors that cause decrease PCV. List the possible sources of error in the determination of PCV. Instruments & Reagents For Venous Blood Wintrobe tube Pasteur pipette Centrifuge Anticoagulant: Potassium Oxalate crystals (EDTA can also be used) For Capillary Blood Heparinized capillary tubes Micro-centrifuge Procedure for Venous Blood PCV Using Wintrobe Method Blood Collection: Perform venipuncture to collect blood into a tube with a pinch of oxalate crystals mixture. Mixing: Mix the blood with anticoagulant by rolling the tube between the palms of both hands. Transfer: Draw blood into a Pasteur pipette and introduce it into the Wintrobe tube. Wintrobe Tube Details: Special centrifuge tube with uniform diameter throughout. Holds about 1 ml of blood. Graduations are scaled in reversed directions on each side so either plasma or cell volume can be read. Filling: Fill the Wintrobe tube with blood from a fine teat pipette up to the 100 mark (equivalent to 100%). Centrifugation: Centrifuge the tube. Reading: Read the PCV as a percentage of the total volume. Procedure for Capillary Blood PCV Using Microhematocrit Method Labeling: Using labeling paper, mark two micro capillary tubes as X and Y. Blood Sample: Place blood into watch glass X. Tube Filling: Dip one end of tube X into the blood at an angle. Allow tube to fill to 3/4 full by capillary attraction. Sealing: Close the open end with index finger. Lift tube off the blood and seal the end with plasticine wax. Open the tip to remove excess wax. Centrifuge Setup: Open micro centrifuge lid and unscrew top to expose segment carrier. Fix micro capillary tubes (sealed end first) in segments X and Y. Centrifugation: Close lid and start centrifuge. Centrifuge for 5 minutes. Gradually increase speed to 10,000 rpm. Reading: Remove segments and place into micro hematocrit reader. Position tube so total blood column reads from 0% to 100%. Place movable arm so line cuts the interface between cells and plasma. Record results in % volumes. RESULTS Measurements PCV of Male: PCV of Female: Thickness of Buffy Coat: Components Separated Plasma (Top) Buffy Coat (Middle) Red Cells (Bottom) DISCUSSION TOPICS Comparison of both methods: Discuss the differences, advantages, and disadvantages between Venous (Wintrobe) vs Capillary (Microhematocrit) methods. Clinical Application: Describe the use of PCV (Packed Cell Volume) in clinical practice. CLINICAL SIGNIFICANCE OF ABSOLUTE CORPUSCULAR VALUES Knowledge of hemoglobin level, RBC count, and PCV (Hematocrit) alone does not provide information about: Average red blood cell volume. Hb content per cell. Percentage saturation with hemoglobin. These parameters are crucial for diagnosing anemia types. While not obtainable directly through experimental methods, they can be calculated from three basic values: Hemoglobin (Hb), RBC count, and PCV. Student Objectives (Corpuscular Values) Explain the clinical significance of calculating absolute corpuscular values. Describe the macro-corpuscular values and different formulas used in calculations. Describe the classification of anemia based on hematological indices. Calculations & Formulas Required Basic Measurements: 1. Hb (g/100ml) 2. RBC count (×10⁶ cells/mm³) 3. PCV (% per 100ml blood) 1. Mean Corpuscular Volume (MCV) Definition: Average volume of a single red blood cell, expressed in femtoliters (fl). Formula: MCV = (PCV × 10) / RBC count OR: MCV = PCV per liter / RBC (10¹²/L) Normal Range: 74 – 95 femtolitres 2. Mean Corpuscular Hemoglobin (MCH) Definition: Average hemoglobin content (weight) in a single red blood cell, expressed in picograms (pg). Clinical Use: Basis for classifying anemia into hypochromic, normochromic, and hyperchromic types. Formula: MCH = (Hb in g/100ml) / RBC count (RBC count in million/mm³) Normal Range: 27 – 32 pg 3. Mean Corpuscular Hemoglobin Concentration (MCHC) Definition: Relationship between hemoglobin and volume in red blood cells, expressed as percentage saturation of cells with Hb (not whole blood). Key Principle: RBCs cannot exceed ~36% Hb concentration due to limitations in Hb synthesizing machinery. Formula: MCHC = (Hb × 100) / PCV Normal Range: 30 – 36% Other Hematological Indices (for further reading): Mean Corpuscular Diameter (MCD) Color Index (CI) QUESTIONS 1. Reliability Giving a reason, state which of the corpuscular values (MCV, MCH or MCHC) is most reliable and useful clinically? 2. Physiological Limits Why can’t RBCs be filled beyond 36% with Hb? 3. Classification How can you classify anemias on the basis of MCV and MCH? Hematology Steeplechase: Hb, PCV & Indices Hematology Steeplechase Hb Estimation, PCV & Clinical Indices Exam Focus: Calculations: Know your formulas for MCV, MCH, and MCHC. Equipment: Identify Sahli’s vs. Wintrobe’s tubes. Layers: Locate the Buffy Coat. Principles: Acid Hematin vs. Cyanmethemoglobin. Start Blood Lab Quiz Station 1 Equipment Check Answer Next Station Lab Session Completed! Results for . Score 0/0 Accuracy 0% Download Hematology Report Processing images and generating PDF…
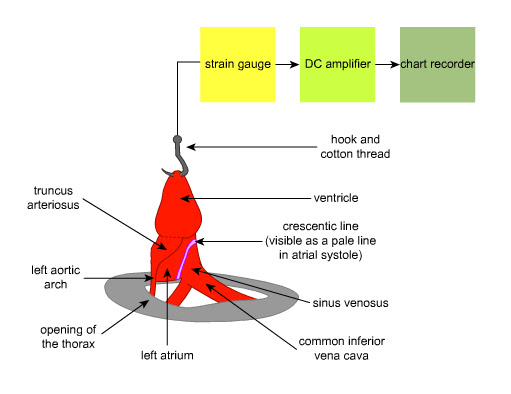
TOAD HEART IN SITU & PROPERTIES OF CARDIAC MUSCLE EXPERIMENT 1: TOAD HEART IN SITU AND PROPERTIES OF CARDIAC MUSCLE Objectives Describe the method of isolation of the toad heart. Determine the effect of temperature on cardiac muscle. List the effect of different ions and drugs on the isolated heart muscle. Explain the mechanism of action of drugs and ions on the cardiac muscle. List the properties of the cardiac muscle. Elaborate the physiological basis of different properties of the cardiac muscle. Introduction The naturally beating toad heart is first observed in situ with its apex connected to a writing lever for recording the sequence of events during contraction. The heart rate is altered by changing the temperature of the bathing fluid. Electrical stimuli are applied between beats to illustrate properties of the conducting system of the heart. Once the conducting system has been inactivated by crushing, cardiac muscle can be studied as a muscle preparation. Cardiac muscle has a different stimulus-response relationship from skeletal muscle, and it shows refractoriness to a second stimulus at some stimulus intervals. Apparatus Kymograph A motor-driven rotating drum that operates at four different speeds, equipped with a clutch mechanism. The drum carries smoked paper that is written on by various levers. Note: Traces must be fully labeled including student names before being shelled. Induction Coil Provides either single stimuli or repetitive stimuli. Note: Relative stimulus strength must always be recorded as the distance in centimeters between primary and secondary coils. Preparation A. Dissection Use a pithed toad (brain and spinal cord destroyed) placed on its back on a cork board. Pin through the web of each foot and the lower jaw. Expose the xiphisternum (cartilaginous extension of the sternum). Make a transverse incision through the abdominal wall below the xiphisternum. Cut through both sides of the sternum and pectoral girdle. Remove anterior thoracic wall. CRITICAL: Frequently irrigate tissues with physiological saline to prevent dessication (drying out). Display thoracic contents by repinning front feet wider apart. Carefully incise the pericardium laterally and reflect it back. Observe heart action and identify successive contractions of the sinus venosus, atria, ventricles, and truncus arteriosus. B. Mounting for Recording Tie silk thread to a fine hook and pass through the ventricle tip without puncturing tissue. Gently lift heart and cut the transverse pericardial ligament (between atria and venous side). Transfer toad to recording stand bath. Anchor heart base with pin through connective tissue near the aorta. Keep heart moist with Ringer’s solution but do not fill the bath yet. WARNING: Skin secretions are toxic—prevent bath fluid contamination. Tie silk thread to the hole nearest the heart lever pivot (must be precisely vertical). Adjust lever vertically so it’s horizontal when heart is relaxed and thread is just taut. Adjust kymograph for maximum friction. Adjust lever spring for 1-2 cm amplitude tracing. EXPERIMENTAL PROCEDURES A. Heart Beat & Temperature Effects 1. Baseline Recording Speed: Moderate (25 mm/sec). Observation: Make a short record. Relate lever movements to actual heart chambers—identify up to four contractile events. 2. Temperature Effects (General) Speed: Slow (2.5 mm/sec). Temps: Bathe heart with saline at approx 0°C, 10°C, and 20°C. Note: Ensure pipette is cooled/heated by solution. Measure temperature accurately. Use signal marker and clock for time traces. Alternate Temperature Procedure Label beakers: 0°C, 10°C, 20°C, 30°C, 40°C. Add 3 mL frog Ringer’s to each. Immerse muscle at 0°C, record twitch. Replace with 20°C and 30°C, wait 30 seconds, record. Replace with 10°C, wait 1 minute, record. Replace with 40°C, record irregular twitches. Analysis: Draw lines from curve summits to baseline. Record graph heights (cm) and durations. Data Table 1: Heart Rate vs Temperature Temperature (°C) Heart Rate (beats/min) Observations 0 10 20 30 40 B. Refractory Period of Conducting System 1 Place Electrodes: One against auricles, other against ventricle. Note: Must not impede movement. 2 Settings: Set signal marker in primary circuit for single break stimuli. Run drum at moderate speed (25 mm/sec). 3 Stimulus Strength: Move secondary coil to produce supra-maximal stimuli (8-10 cm on scale). 4 Procedure: Apply single stimuli at various times during the cardiac cycle (systole and diastole). Measurement Required: Determine refractory period duration and maximum “compensatory pause”. C. Mechanical Block of Conduction (Stannius Ligatures) Preparation: Pass moistened silk thread between aortae and veins, tie loosely. Record at slow speed (2.5 mm/sec). First Ligature (Sinus-Atrial) Tighten ligature across the sinus venosus-atrial junction (white crescent). Effect: Crushes conducting tissues to auricles; sinus continues beating alone while the rest of the heart may stop temporarily. Second Ligature (Atrio-Ventricular) Tie between atrium and ventricle across the atrioventricular bundle. Effect: Isolates the ventricles from the atria. Measurement Required: Determine the inherent rates of the auricles and ventricles separately after isolation. D. PROPERTIES OF CARDIAC MUSCLE 1. Stimulus-Response Relationship Set secondary coil at maximum distance from primary coil. Apply single break stimuli to ventricle (both electrodes) at ~15-second intervals. Between stimuli, turn drum ~1 cm by hand to separate traces. Successively increase stimulus strength (move coils closer) until ventricle responds. Record cm position of secondary coil for each response. Find sub-threshold stimulus, then switch to repetitive stimulation. Observe response to brief repetitive stimulation. 2. Refractory Period of Directly Stimulated Muscle Reconnect for single stimuli. Set supra-threshold stimulus strength. Run drum at moderate speed (25 mm/sec). Apply paired stimuli by two quick taps of telegraph key (< 1 second intervals). Measurement: Determine the maximum interval without a second contraction. This represents the refractory period. Repeat with increased stimulus strength (refractory period should shorten). Apply brief repetitive supra-threshold stimuli—compare response to single stimulus. E. EFFECT OF IONS ON HEART IN SITU Ion Effects Overview: Isotonic NaCl: Rhythm disappears, beating ceases. CaCl₂: Heart beats briefly, then stops in systole (contraction). KCl: Heart stops in diastole (relaxation). Ringer’s solution (all three ions): Beating continues indefinitely. Ringer’s Solution Composition: NaCl: 0.9 g CaCl₂: 0.024 g KCl: 0.042 g NaHCO₃: 0.02 g Distilled water to 100 mL Procedure Bathe heart with Ringer’s until baseline rate established. Prepare NaCl, KCl, CaCl₂ at 3× concentration.